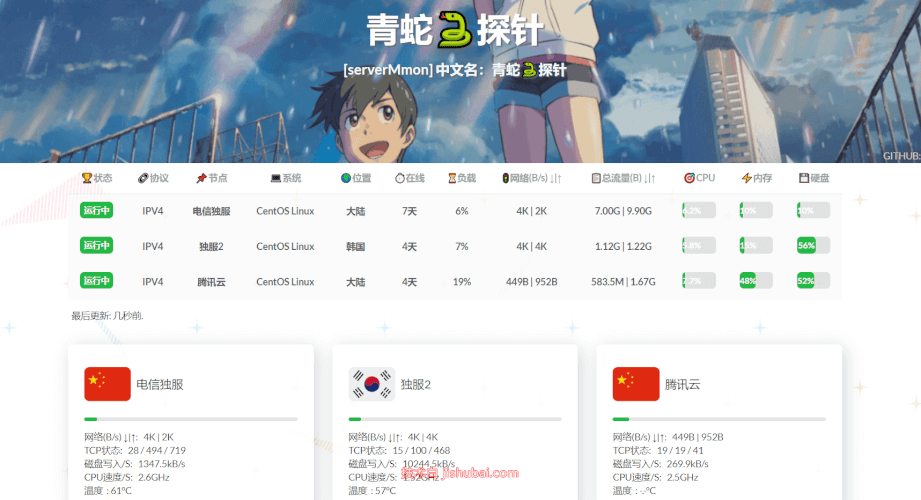
青蛇探针serverMmon
Github项目地址:https://github.com/souying/serverMmon文章源自技术白-https://jishubai.com/1409.html
在线演示:http://106.126.11.114:5880/文章源自技术白-https://jishubai.com/1409.html
其它探针程序:文章源自技术白-https://jishubai.com/1409.html
自动部署方式
【服务端】文章源自技术白-https://jishubai.com/1409.html
在要部署面板的服务器中执行下列命令,三种方式,任选1种即可,其中docker部署需要先安装docker并运行文章源自技术白-https://jishubai.com/1409.html
1.1、一键安装脚本部署文章源自技术白-https://jishubai.com/1409.html
1.2、Docker一键部署命令文章源自技术白-https://jishubai.com/1409.html
1.3、docker-compose方式一键部署:文章源自技术白-https://jishubai.com/1409.html
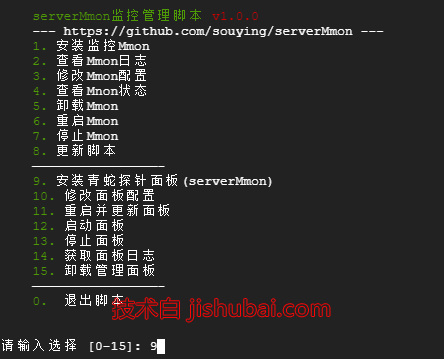
2、这里通过脚本安装,执行命令后输入9安装探针面板,安装后即可在浏览器中通过 IP:端口/admin 访问面板后台,首次安装后需要注册管理账号;文章源自技术白-https://jishubai.com/1409.html
【监控端】文章源自技术白-https://jishubai.com/1409.html
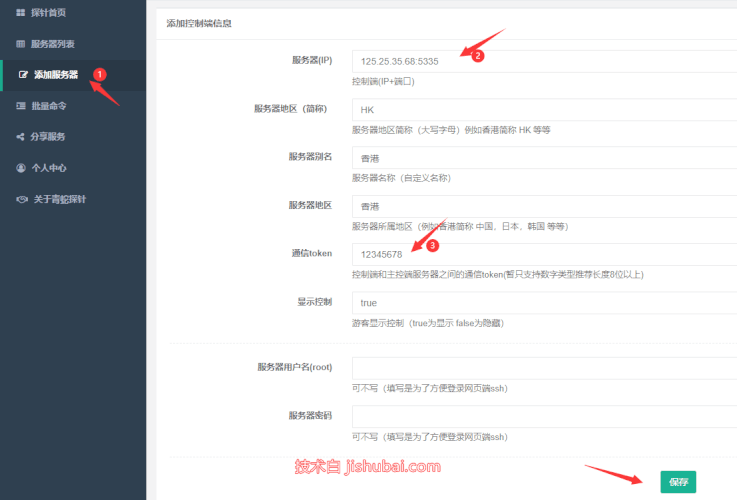
1、先在面板中添加需要监控的服务器信息,主要是 服务器IP+通信端口,通信token信息,其它随意,其中通信端口需要防火墙或安全组放行;文章源自技术白-https://jishubai.com/1409.html
2、在需要监控的服务器中执行下列脚本,输入1安装监控端,然后输入上面填的通信token和通信端口即可;文章源自技术白-https://jishubai.com/1409.html
以上执行后按脚本提示安装,安装完毕后,命令行直接执行mmon 或者 MMON 可弹出脚本菜单文章源自技术白-https://jishubai.com/1409.html
手动安装教程
【服务端配置】文章源自技术白-https://jishubai.com/1409.html
1、创建文件夹文章源自技术白-https://jishubai.com/1409.html
2、拉取源码文章源自技术白-https://jishubai.com/1409.html
3、安装依赖文章源自技术白-https://jishubai.com/1409.html
4、修改上面主要说明文件(修改配置文件)文章源自技术白-https://jishubai.com/1409.html
5、启动测试文章源自技术白-https://jishubai.com/1409.html
如果没错误提示,OK,ctrl+c关闭;如果有错误提示,检查5999端口是否被占用文章源自技术白-https://jishubai.com/1409.html
关键说明: 如每次修改完配置文件 请执行以下命令 重启服务端
以上需要node 环境,如宝塔安装 正常使用node项目安装方式即可, pm2 常用命令 请搜索
ip+端口/ 即可访问,可自行设置域名反代
ip+端口/admin 即可访问后台管理,首次安装后需要注册管理账号
ip+端口/ssh 即可访问在线SSH


